

The cooler whether has me itching for some good old making, and I found the time to squeeze in a new knitting project! And since I haven't forgotten this dusty old blog with it's crafty following, I went the extra mile and wrote up the pattern. I hope you like it!
This base of this plushy toy can be made into any sort of animal you like. My daughter wanted a cat, so a cat she gets. It is a rather tricky pattern, but I hope I made it easier by adding some charts and some pictures.
Materials:
4 colors of worsted weight yarn: 1 for body, 1 for accent, 1 for eyes, and black for whiskers.
Size 2 knitting needles; either circular or DPN to work in the round.
Small crochet hook
Tapestry needle
Filler.
Size of plush is approximately 8 inches tall and six inches wide.
 |
| He looks French, doesn't he? |
CO 4, join to work in the round.
k1m1 x 4 (8)
k8
k1m1 x 8 (16)
k16
k2m1 x 16 (24)
k24
k2m1 x 24 (36)
k36
k3m1 x 36 (48)
k48 for 12 rows, then begin decreasing for the neck.
k3, k2tog x 48 (39)
k39
k2, k2tog x 39 (32)
k32
k2, k2tog x 32 (24)
k24
k2, k2tog x 24(18)
k18 for 2 rows, then place 8 stitches on reserve.
turn, p10, turn
k1m1, k8, k1m1 (12)
p12
k1m1, k10, k1m1 (14)
p14
k1m1, k12, k1m1
p16
Place the working stitches on reserve and pick up the 8 stitches that were placed on reserve earlier.
p8
k1m1, k6, k1m1 (10)
p10
k1m1, k8, k1m1 (12)
p12
k1m1, 10, k1m1 (14)
p14
k1m1, 12, k1m1 (16)
p16
Keeping the stitches on your needle, pick up the 16 stitches that were placed on reserve earlier. Join stitches in the round and *Knit 2 rows. (32)
Begin increasing the body by adding 4 stitches on every other row. My method for doing this is to add one stitch to the ends of each needle in a sequence spanning 2 rows. I did it this way to make the additions virtually invisible.
TWO ROWS: K1m1, k15, k1m1, k14, k1m1, k16, k1m1, k18 (36)
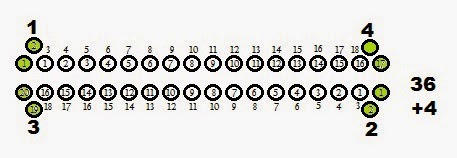
*Use the following chart for reference:
*Use the following chart for reference:

Knit one row.
TWO ROWS: k1m1, k17, k1m1, k16, k1m1, k18, k1m1, k20 (40)
TWO ROWS: k1m1, k17, k1m1, k16, k1m1, k18, k1m1, k20 (40)
Knit one row.
TWO ROWS: k1m1, k19, k1m1, k18, k1m1, k20, k1m1, k22 (44)

Knit one row.
TWO ROWS: k1m1, k21, k1m1, k20, k1m1, k22, k1m1, k24 (48)

Knit one row.
TWO ROWS: k1m1, k23, k1m1, k22, k1m1, k24, k1m1, k26 (52)

Knit one row.
TWO ROWS: k1m1, k25, k1m1, k24, k1m1, k26, k1m1, k28 (56)
TWO ROWS: k1m1, k25, k1m1, k24, k1m1, k26, k1m1, k28 (56)

Knit one row.
You should now have 56 stitches.
Locate the section that will be the front of the animal.
Take two stitches off of each side of the front and place them on the back
needle. This way, you will have 24 stitches in the front and 32 stitches in the
back. Place the front 24 stitches on reserve. You will now begin shaping the
animal’s backside.
Turn the work and purl all 32 stitches.
K1m1, k12, k2tog, k4, k2tog, k12, k1m1 (32)
Purl 1 row.
k1m1, k11, k2tog, k6, k2tog, k11, k1m1 (32)
Purl 1 row.
k1m1, k10, k2tog, k8, k2tog, k10, k1m1 (32)
Purl 1 row.
k9, k2tog, k10, k2tog, k9 (30)
Purl 1 row.
k8, k2tog, k12, k2tog, k8 (28)
Purl 1 row.
k7, k2tog, k14, k2tog, k7 (26)
P2tog, p22, p2tog (24)
k2tog, k4, k2tog, k6, k2tog, k4, k2tog (18)
P2tog, p14, p2tog (16)
k2tog, k2, k2tog, k6, k2tog, k2, k2tog (14)
P2tog, 10, p2tog (12)
k2tog, k2tog, k4, k2tog, k2tog (6)
 |
| You can see the decreases on the bottom of the animal. |
Divide your front stitches in half and mark the center. You
want to place the middle six stitches on your needle, intermittently with your
remaining six back stitches. The other stitches will be placed on reserve and
later worked into the legs.
Please refer to the photograph. To do this, take the nine stitches from the far right side of the front and place them on reserve. Next, take the nine stitches from the far left side of the front and place them on reserve. This leaves you six working stitches in the center of the front of your animal. Now, one by one, slip these in between the six working stitches from the back of your animal so that you have twelve working stitches on your needle and the gap and your front and back pieces are now joined between the legs.
K2tog, K2tog, Slip the back loop over the front loop to bind off.
Repeat this process for the remaining ten stitches until you have joined and bound off all.
 |
| This photo generated an awkwardly hilarious Facebook thread. I have strange friends. |
Legs and arms:
Pick up 22 stitches from around the hole of the arm or leg.
Pick up 22 stitches from around the hole of the arm or leg.
Knit in the round for 12 rows.
Bind off.
Repeat this on the other leg and arm holes.
Stuff the animal with filler of your choice before closing the arm and leg holes.
To close the arms and legs:
On the bottom of the leg or arm, pick up 8 stitches and knit them across.
Turn. Slip the first stitch, Purl 5, p2tog; insert a crochet hook into another loop on the side of the arm and pull another stitch through to make the stitch count back to 8.
Turn. Slip the first stitch, knit 5, k2tog, insert a crochet hook into another loop on the side of the arm and pull another stitch through to make the stitch count back to 8.


Repeat 4 times, until you have 8 rows. You should have 8 loops remaining on the top of your arm or leg. If you need to, you can use the same loop twice in order to fully close the gap and not have excess puckering.
Instead of slipping the first stitch, P2tog, p4, p2tog. (6)Pick up a stitch from the leg or arm, knit it together with a stitch from your needle.
Pick up a second stitch from the leg or arm, knit it together with a stitch from your needle, and then pull the first stitch over the second stitch in order to bind off. Repeat this across the top of the arm or leg hole until completely closed.

Once the arms and legs are closed you can now determine whether you are going to be making a bear, a cat, a bunny or something else! I chose to make a cat (or rather, my daughter chose), but you can easily modify the length and shape of the nose, ears and tail to make a different kind of animal.
For the cat’s nose:
Pick up 16 stitches from the front of the face, in an oval shape to knit in the round.
Knit 4 rows.
K2tog 8 times, to make 8 stitches.
Knit 1 row.
K2tog 4 times to make 4 stitches.
Stuff with filler before knitting 2tog for the remaining stitches until you are down to one. Secure your final stitch with a slip knot and pull the loose tail of yarn through the inside of the head and out through the back of the neck, using a crochet hook. Pull all loose threads through the and out through the back of the neck.
Use a tapestry needle to pull a piece of yarn taught down the middle of the nose, forming the cheeks. This resembles a butt shape. Next use the tapestry needle and yarn color of your choice to sew the nose and eyes, using a satin embroidery stitch. Use black yarn to make the whiskers.
To make the cats ears:
from the right, pick up 10 stitches on the top of the head, where you want your right ear to be placed. Use your alternate color and make sure your knit stitches are facing the front. Knit and purl to make 5 rows.
P2tog, p6, p2tog
K2tog, k4, k2tog
P2tog, p2, p2tog
K2tog, k2tog
P2tog, pull through and secure tail end.
Turn the cat around and this process behind the cat's ear, using your main body color and keeping your knit stitches facing the back of your cat. You will tie off the tail ends on the inside of the two ear flaps, and use a tapestry needle to sew them together. This will make the cats ears stand up.
To make the cats tail:
Pick up 12 stitches
Join and knit in the round for 20 rows, or until your tail is as long as you’d like.
Knit a collar:
Whether you’re making a bear or a cat, a bunny or a puppy, you’re going to need to hide the tail ends that you weaved into the back of the neck. I knitted a collar, but you can use a ribbon or strip of fabric.
CO six stitches.
S1, K5 (Slip the first stitch, knit 5)
S1, P5 (slip the first stitch, purl 5)
repeat for approximately 30 rows.
Sew onto the animal to cover any knots.

No comments:
Post a Comment