Showing posts with label Knitting. Show all posts

Monday, September 22, 2014

Little French Kitty

Gosh, has it been a while! I have been preoccupied with work and school and art business, not to mention the most important piece of me, my husband and kids.
The cooler whether has me itching for some good old making, and I found the time to squeeze in a new knitting project! And since I haven't forgotten this dusty old blog with it's crafty following, I went the extra mile and wrote up the pattern. I hope you like it!

This base of this plushy toy can be made into any sort of animal you like. My daughter wanted a cat, so a cat she gets. It is a rather tricky pattern, but I hope I made it easier by adding some charts and some pictures.

Materials:
4 colors of worsted weight yarn: 1 for body, 1 for accent, 1 for eyes, and black for whiskers.
Size 2 knitting needles; either circular or DPN to work in the round.
Small crochet hook
Tapestry needle
Filler.

Size of plush is approximately 8 inches tall and six inches wide.

He looks French, doesn't he?


CO 4, join to work in the round.
k1m1 x 4 (8)
k8
k1m1 x 8 (16)
k16
k2m1 x 16 (24)
k24
k2m1 x 24 (36)
k36
k3m1 x 36 (48)
k48 for 12 rows, then begin decreasing for the neck.
k3, k2tog x 48 (39)
k39
k2, k2tog x 39 (32)
k32
k2, k2tog x 32 (24)
k24
k2, k2tog x 24(18)
k18 for 2 rows, then place 8 stitches on reserve.
turn, p10, turn
k1m1, k8, k1m1 (12)
p12
k1m1, k10, k1m1 (14)
p14
k1m1, k12, k1m1
p16
Place the working stitches on reserve and pick up the 8 stitches that were placed on reserve earlier.
p8
k1m1, k6, k1m1 (10)
p10
k1m1, k8, k1m1 (12)
p12
k1m1, 10, k1m1 (14)
p14
k1m1, 12, k1m1 (16)
p16
Keeping the stitches on your needle, pick up the 16 stitches that were placed on reserve earlier. Join stitches in the round and *Knit 2 rows. (32)
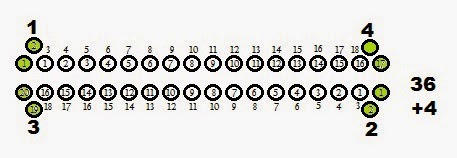
Begin increasing the body by adding 4 stitches on every other row. My method for doing this is to add one stitch to the ends of each needle in a sequence spanning 2 rows. I did it this way to make the additions virtually invisible.

TWO ROWS: K1m1, k15, k1m1, k14, k1m1, k16, k1m1, k18 (36)
*Use the following chart for reference:


Knit one row.
TWO ROWS: k1m1, k17, k1m1, k16, k1m1, k18, k1m1, k20 (40)


Knit one row.
TWO ROWS: k1m1, k19, k1m1, k18, k1m1, k20, k1m1, k22 (44)


Knit one row.
TWO ROWS: k1m1, k21, k1m1, k20, k1m1, k22, k1m1, k24 (48)


Knit one row.
TWO ROWS: k1m1, k23, k1m1, k22, k1m1, k24, k1m1, k26 (52)
Knit one row.
TWO ROWS: k1m1, k25, k1m1, k24, k1m1, k26, k1m1, k28 (56)


Knit one row.

You should now have 56 stitches.

Locate the section that will be the front of the animal. Take two stitches off of each side of the front and place them on the back needle. This way, you will have 24 stitches in the front and 32 stitches in the back. Place the front 24 stitches on reserve. You will now begin shaping the animal’s backside.
Turn the work and purl all 32 stitches.
K1m1, k12, k2tog, k4, k2tog, k12, k1m1 (32)
Purl 1 row.
k1m1, k11, k2tog, k6, k2tog, k11, k1m1 (32)
Purl 1 row.
k1m1, k10, k2tog, k8, k2tog, k10, k1m1 (32)
Purl 1 row.
k9, k2tog, k10, k2tog, k9 (30)
Purl 1 row.
k8, k2tog, k12, k2tog, k8 (28)
Purl 1 row.
k7, k2tog, k14, k2tog, k7 (26)
P2tog, p22, p2tog (24)
k2tog, k4, k2tog, k6, k2tog, k4, k2tog (18)
P2tog, p14, p2tog (16)
k2tog, k2, k2tog, k6, k2tog, k2, k2tog (14)
P2tog, 10, p2tog (12)
k2tog, k2tog, k4, k2tog, k2tog (6)

You can see the decreases on the bottom of the animal.


Divide your front stitches in half and mark the center. You want to place the middle six stitches on your needle, intermittently with your remaining six back stitches. The other stitches will be placed on reserve and later worked into the legs.
Please refer to the photograph. To do this, take the nine stitches from the far right side of the front and place them on reserve. Next, take the nine stitches from the far left side of the front and place them on reserve. This leaves you six working stitches in the center of the front of your animal. Now, one by one, slip these in between the six working stitches from the back of your animal so that you have twelve working stitches on your needle and the gap and your front and back pieces are now joined between the legs.
K2tog, K2tog, Slip the back loop over the front loop to bind off.
Repeat this process for the remaining ten stitches until you have joined and bound off all.

This photo generated an awkwardly hilarious Facebook thread. I have strange friends.


Legs and arms:
Pick up 22 stitches from around the hole of the arm or leg.
Knit in the round for 12 rows.
Bind off.

Repeat this on the other leg and arm holes.

Stuff the animal with filler of your choice before closing the arm and leg holes.

To close the arms and legs:
On the bottom of the leg or arm, pick up 8 stitches and knit them across.
Turn. Slip the first stitch, Purl 5, p2tog; insert a crochet hook into another loop on the side of the arm and pull another stitch through to make the stitch count back to 8.
Turn. Slip the first stitch, knit 5, k2tog, insert a crochet hook into another loop on the side of the arm and pull another stitch through to make the stitch count back to 8. 


Repeat 4 times, until you have 8 rows. You should have 8 loops remaining on the top of your arm or leg. If you need to, you can use the same loop twice in order to fully close the gap and not have excess puckering.
Instead of slipping the first stitch, P2tog, p4, p2tog. (6)
Pick up a stitch from the leg or arm, knit it together with a stitch from your needle.
Pick up a second stitch from the leg or arm, knit it together with a stitch from your needle, and then pull the first stitch over the second stitch in order to bind off. Repeat this across the top of the arm or leg hole until completely closed.


Once the arms and legs are closed you can now determine whether you are going to be making a bear, a cat, a bunny or something else! I chose to make a cat (or rather, my daughter chose), but you can easily modify the length and shape of the nose, ears and tail to make a different kind of animal.

For the cat’s nose:
Pick up 16 stitches from the front of the face, in an oval shape to knit in the round.
Knit 4 rows.
K2tog 8 times, to make 8 stitches.
Knit 1 row.
K2tog 4 times to make 4 stitches.
Stuff with filler before knitting 2tog for the remaining stitches until you are down to one. Secure your final stitch with a slip knot and pull the loose tail of yarn through the inside of the head and out through the back of the neck, using a crochet hook. Pull all loose threads through the and out through the back of the neck.
Use a tapestry needle to pull a piece of yarn taught down the middle of the nose, forming the cheeks. This resembles a butt shape. Next use the tapestry needle and yarn color of your choice to sew the nose and eyes, using a satin embroidery stitch. Use black yarn to make the whiskers.

To make the cats ears:
from the right, pick up 10 stitches on the top of the head, where you want your right ear to be placed. Use your alternate color and make sure your knit stitches are facing the front. Knit and purl to make 5 rows.
P2tog, p6, p2tog
K2tog, k4, k2tog
P2tog, p2, p2tog
K2tog, k2tog
P2tog, pull through and secure tail end.

Turn the cat around and this process behind the cat's ear, using your main body color and keeping your knit stitches facing the back of your cat. You will tie off the tail ends on the inside of the two ear flaps, and use a tapestry needle to sew them together. This will make the cats ears stand up.


To make the cats tail:
Pick up 12 stitches
Join and knit in the round for 20 rows, or until your tail is as long as you’d like.

Knit a collar:
Whether you’re making a bear or a cat, a bunny or a puppy, you’re going to need to hide the tail ends that you weaved into the back of the neck. I knitted a collar, but you can use a ribbon or strip of fabric.
CO six stitches.
S1, K5 (Slip the first stitch, knit 5)
S1, P5 (slip the first stitch, purl 5)
repeat for approximately 30 rows.

Sew onto the animal to cover any knots.


Sunday, September 22, 2013

My Fall Favorites! My Best Fall Posts

It's Fall! It's finally here!

I first noticed Fall one day last week when I saw a small yellow leaf on the floor of the dining room. Since then, I've been checking for more signs every day. Sure enough, the very next day, there was a sprinkling of leaves when the wind kicked up while we were playing in the backyard with our friends. Three days ago I saw the first spots of red on the slope of trees opposite my house. And today - officially, is Fall!

To celebrate, I have compiled all of my favorite Fall Posts from the last two years. My favorite Fall recipes, crafts and activities.


Fall Recipes:
Whole Wheat Cheese Raviolis with Apricot Squash Sauce
Apricot Squash Soup with Grilled Provolone Sandwiches
Vegetarian Chili With Meat Alternative
Nonfat Pumpkin Chocolate Chip Cookies
Nonfat Crab and Squash Chowder


Fall Festivities:
A Yard For Harvest
Seed Saving How and Why

Fall Crafts:
Harvest Wreath
Sweater Legs
Cable and Ribbed Glove Pattern
Table Centerpieces From Found Natural Materials
Embroidered Heirloom Pillows


Friday, February 15, 2013

Hand Sewn Knitted Wallet

I don't toot my own horn very often, but I do want to say that this wallet is probably one of the coolest things I've ever made. I can't stop taking it out and looking at it.
I wanted a wallet that functioned like my husbands, but I also liked the wallet I had bought for myself. Namely because it had a change purse and the photo ID slot was More easily accessible. I also wanted a wallet to match my new purse I made earlier this week.

I was also able to make this wallet using scrap yarn and scrap fabric, so that the cost for me was free.

To make this wallet, you will need:

Pattern (provided below)
Knitted outer shell (pattern provided below) 8" x 4"
1/2 yard of fabric
1 sheet of thin sturdy cardboard or plastic
Masking tape
Clear Plastic piece for the photo ID pocket
Needle and Thread
Decorative Button
4.5" zipper

The pattern for the knitted shell of your wallet is thus:
On size 3 needles, using bulky yarn *(I used Homespun by Lion Brand) -
Cast On 35 stitches
Odd rows: P2, K33, P2
Even rows: P
Knit approximately 24 rows, or until you have a swatch that is 8 inches wide and 4 inches tall.


Here is the pattern for the sewn portion. It is in PNG, you need to click on the thumbnails and bring up the larger image. Right click on them and save them to your PC. There, you can print them through any drawing program, like Window's Paint. Make sure that you configure your page set-up to print portrait style, not landscape, and that you have the image stretched to fill up the page, and your paper size is Letter 8.5" x 11".
Once printed, measure the red brackets to see that they are indeed an inch. I have also placed the dimensions of the pattern pieces on them, you can draw them yourself with a ruler if you cannot print these off.


*****
 
 
Now that you have your outside of the wallet knitted and your fabric pieces cut to size, it's time to assemble. I apologize for the crummy pictures. I was working quickly.
 
1.
 
Fold the raw edges of your back lining piece (4.5" x 8.5" under, and pin them to the back side of your knitted fabric. Sew this in place.
 
2.

 
Take another piece of fabric that you cut 8.5" x 4.5" and fold the raw edges in on the long sides. Use one of your cardboard/plastic squares that you cut as a guide for this, as you will be folding this up inside of your fabric. Once you have pressed the raw edges in, fold the fabric in half as shown in the second photo and use your needle and thread to hand stitch along the top and bottom of this piece. This is going to be the flap that will eventually hold your photo ID and other cards.
 
3.
 
Sandwich your flap in between the two pieces that are written "front of billfold" (4.5" x 5") with right sides together, and sew along the raw edge. You want to sew this very securely with a machine or small close stitches as this will take a lot of wear.
 
4.
 
 
On each of your six 4.5" x 3" card slot pieces, press the top edge down by a quarter inch. You may wish to sew but because I was hand stitching, I cheated and used a bit of masking tape.
 
5.

 
Assemble your card slots, by stacking 3 of them together with approximately 1/4" staggering. Fold the sides of these assemblies in and the bottom of them up. Press them with an iron and then pin them to the inside of your assembled wallet pieces. I chose to have one on the back "page" of my wallet and one on the back side of the flap. Sew these into place.
 
6.

 Fold the edges of your 1.5" x 4" piece under and press them down.

I sew them onto your clear plastic piece (I took mine from an old wallet) by first sewing on the bottom and top pieces - then the two sides.

The side strips are sewn on last, so that the edges can be folded under the top and bottom pieces. When you sew this assembly onto the flap of your wallet, only sew along the top and bottom of it.
 
 
7.

 
 Fold the bottom/top edges of your two change purse sections under, press them.
 
Pin them to your closed zipper and sew them down.
 
Fold the outer raw edges under, press them with an iron and pin then sew them to the remaining "page" of your wallet assembly.

It is helpful to undo the zipper partially and sew the zipper together near the end with a couple of stitches. You will cut these stitches after the piece is sewn on so that the zipper can fully close.
 
 
8.


 Lay your final 8.5" x 4.5" piece of fabric face
down on top of your wallet assembly and sew along the top of it, keeping your seam parallel with the card slots, flap and top of the change purse and not sewing over them.

Open up the seam and place your two remaining cardboard/plastic supports inside of them. Fold the top section down and press with an iron. Top stitch down the center of your assembly right between the gap of the two support cards. This will:
a. bind the two pieces of fabric together more securely.
b. prevent the cards from shifting and overlapping.
c. You will sew down the back side seam of your ID slot.

 
9.


Fold the raw edges of your wallet assembly under and press them flat. Pin this to the lining of your knitted shell, and sew it along the two sides and the bottom. Your support pieces should be pressed upwards into that top seam as firmly as you can so that they will be completely snug as you sew along the bottom.
 
10.
 
You're nearly done now! Knit or Crochet a loop to one side of your wallet, and sew your decorative button onto the other side so that your handy new wallet will stay closed inside your purse or handbag.


Add all of your stuff to it and you're ready to go!


Wednesday, February 13, 2013

Prismatic Entrelac Purse

I have been making and carrying knapsacks for quite a while now, and although I do love their convenience, I wanted a change. I really love this yarn, called Home-Spun, by Lion Brand and when I saw this entrelac scarf, I knew it's what I would use. Many of the color choices do have the variegation needed to make the squares of different colors. I did choose three colors that I thought would work well together, and alternated them for each tier. I really wanted a prismatic effect with warms and cools, but still Earthy.

Materials:
Size 3 or 4 circular needles with a 32" cable
3 skeins of Home-Spun Lion Brand yarn in Wisteria, Wildfire and Fiesta
1.5 yards of fabric for lining
Zipper
Tissue Paper to make your lining pattern.

********

Rather than show the tutorial on how to make the entrelac bag, I have decided to give you the pattern and then post 3 videos on how to do entrelac. These three videos explain it very well - just remember that instead of doing 6 stitches as she is doing in the video, you will be doing 8.

Thanks so much to Melody, from MelodiesMakings for sharing this!


********
Here is my adapted pattern, based on the above video:
 
CO 8 times 13 stitches (104), join. 
13 is the number of squares or patches you will have in each round.
8 is the number of stitches across each square will be.
 
You can easily adjust the circumference of this bag by either knitting more or fewer squares, or by having more or fewer stitches within each square. 
 
Make 13 base triangles as:

R1 - k, turn.
R2 – p across, turn.
R3 – s1, k1, turn.
R4 – p across, turn.
R5 – s1, k2, turn.
R6 – p across, turn.
R7 – s1, k3, turn.
R8 – p across, turn.
R9 – s1, k4, turn.
R10 - p across, turn.
R11 – s1, k5, turn.
R12 – p across, turn.
R13 – s1, k6, turn.
R14 – p across, turn.
R15 – s1, k7, turn.
R16 – p across, turn.
R17 – s1, k7, *k1 to begin next triangle, and begin sequence again.

Tier 1

**Turn your work so that you are facing the purled side. On the left hand downward slope, pick up 8 stitches putting your needle in from the back
 (knit side) and pulling the yarn through to the knitted side.
Once you have 8 stitches picked up, slip the last stitch onto the left needle and purl it together with the first triangle stitch on the left. Turn.

R1 - **picking up the 8 stitches as described above counts as the first row.
R2 – k across, turn.
R3 – s1, p6, p2tog (purl the last stitch with the first triangle stitch).
R4 – k across, turn.
R5 – s1, p6, p2tog
R6 – k across, turn.
R7 – s1, p6, p2tog
R8 – k across, turn.
R9 – s1, p6, p2tog
R10 – k across, turn.
R11 – s1, p6, p2tog
R12 – k across, turn.
R13 – s1, p6, p2tog
R14 – k across, turn.
R15 – s1, p6, p2tog

Turn the work so that you are starting on the knit side.

Pick up 8 stitches on the left side, inserting the needle through the front and grabbing the yarn from the back. 
Pass the last stitch onto the second needle, and then SSK (slip, slip, knit) it with the first stitch on the next triangle. 
*This is row 1.

R1 - *pick up 8 stitches, SSK the last stitch.
R2 – p across, turn.
R3 – S1, k6, SSK
R4 – p across, turn.
R5 – S1, k6, SSK
R6 – p across, turn.
R7 – S1, k6, SSK.
R8 – p across, turn.
R9 – S1, k6, SSK.
R10 – p across, turn.
R11 – S1, k6, SSK.
R12 – p across, turn.
R13 – S1, k6, SSK.
R14 – p across, turn.
R 15 – S1, k6, SSK.


If you are confused about the combination, Slip, Slip, Knit (SSK), the following video is helpful.


Make as many tiers as you like, in order to give your bag the height that you want. I did eight.

**For the final tier, you make your squares into triangles by knitting or purling two together on both sides. You will k2tog, where you SSK or P2tog the same as you did on the previous teirs, to bind off (consume) the working stitches on the tier below - and as you knit or purl back, decrease on the end of the row. This will create your upside down triangles. (I was unable to find a Youtube video for this).
 
Once I had my tubular shape of the bag, I thought about turning it inside out and sewing along the bottom seam, but I really wanted to avoid a pinched bottom. I wanted a bag that would hold my things easily - whether it be my wallet, glasses or keys, to my knitting supplies.


I picked up 20 stitches from the bottom of the bag, and knitted across. I picked up another adjacent, and then knitted two together. I knitted across again, picked up a stitch, and knitted two together. Take care to keep your rows even as you pick up the side stitches. Use the triangles as your guide and try to stick with picking up 8 stitches from each triangle.
When you get to the other side of the bag and have a length of the bag that is equal to the width of your bottom (approximately 8 inches), you can begin to close. To do this, pick up one stitch from the side of the bag and knit it together with a stitch on your needle. Once you have two stitches on your right needle, pull the right stitch over the left and drop it off so that you are binding off as you are joining. Continue this across the bottom of the bag and then pull the end in and weave it in.

The bottom bag was knitted using Wisteria, and produced a garter stitch, square bottomed bag.


I turned the shell of my bag inside out, and weaved in my ends.

For the strap, I picked up 16 stitches from along the top of the bag and knitted them. The pattern goes:

Even Rows - P2, K12, P2
Odd Rows - P across.

Do this until your strap is approximately 40" or until you have the desired length.

Join the end of the strap to the other side of your bag by picking up stitches on the opposite end one at a time and knitting them together with a stitch from the strap. Once you have 2 stitches on your right needle, pull the right stitch over the left so that you are binding off as you are joining, just as you did on the bottom of the bag.
 
********
 
Part 2
 
Ok, so now you have your bag made, you can leave it as it is, but I prefer to line it with fabric. For one thing, my keys would get caught on the fibers and for another, the bag would stretch and lose it's shape without added support. I also wanted to be able to zip it up.

The first thing you want to do is get a piece of scrap paper and a tape measure. Measure and write down all of the dimensions of your bag, and add an inch.

The reason you add an inch is because the bag has the capacity to stretch and if you make your lining to the size of the bag when it's not in use, you're going to be losing usable space.

With the dimensions recorded, make your pattern. You're going to be sewing a six sided box, basically, but the top side will have two pieces because it's going to have a zipper. You also want to account for your strap.
Measuring the strap (mine was 40 inches) you want to add an inch to the width, and four inches to the length.

Draw your pieces out onto newspaper or tissue paper, or if you're handy at sewing you can even just measure the fabric directly and cut it without using a pattern.

These are my pieces. I have two squares and two rectangles for my sides, a rectangle for the bottom, two pieces for my top, and a long piece for my strap.

I didn't picture it, but I recycled an old zipper from a coat that had been ruined and sadly could not be saved.


At this point in the game, I realized something truly horrific. My sewing machine (brand new, only used 4 times) had been dropped and was now broken. So from this point on, I was hand stitching. If my stitches look sloppy, it's because I'm not fond of hand sewing when I'm used to the ease and speediness of a machine.


Back on point!

I folded my two top pieces in half and sewed them to the longer side pieces that I had cut. It's hard to explain the configuration, but this is why I do photo tutorials.

Place the longer sides of the bag right side up, and lay your folded top strips along the top. Sew at least a half inch seam.

If it looks like the picture, to the left, then it is correct.


Pin the zipper into place and sew it onto each side. Remember that the inside of the bag is the side you want finished, so when making the lining, you want to reverse what you typically do when sewing.


You can see that when the zipper is in place, the sides of the bag will have the right side of the fabric facing down while the zipper is facing up.


At this point (though I forgot to photograph it), you will sew the shorter sides to the sides of the bag.

Do not connect them to the top as of yet. Sew the side pieces together with the right sides of the fabric together with a half inch seam.


To join the top of the bag to the shorter sides, tuck the top pieces under and pin them down.

At this point, hand sewing suited the job more than machine stitching would.


Here is another angle of it with the pins in place.

Sew the bottom of the bag on in the same exact manner.


Fold the edges of the strap lining under, and then wrap the edges of the strap over this, pinning it into place.


Pin the lining of the bag to the knitted shell, tucking the edges under.

Sew them into place, using only an 8th inch  seam allowance. Sew up the strap as well.

At this point, I was again pleased to be hand stitching because I'm afraid the machine would have snagged the knitting or created puckers in places.


Your bag is ready for use, enjoy!


Check back soon for the matching wallet pattern/tutorial!


Wednesday, January 23, 2013

Knitted Star Flower Hair Tie

 
I like to knit various types of flowers, and sew them onto ponytail holders. You can do a lot with these, however, and use them to decorate, or embellish clothing and accessories. You could even mount them onto sticks to make a bouquet in a vase.

You can easily vary the size and shape of these flowers, by increasing or decreasing the amount of stitches, just make sure that the number of your base round stitches is divisible by the number of petals you intend to have. These are six petal flowers, so the base round had to have 36 stitches. If I wanted 5 petals, my round could have 25 of 30 stitches.


Materials:
WW Yarn, in Various Colors (two for each layer of the flower, one for the stamen/pistols and one for the leaves).
Size 2 Circular Needles
Small Crochet Hook
Tapestry Needle
Ponytail Holders (Non elastic) )

Knitted with size 2 circular needles, both in the round and flat.

Knit two of these, in coordinating colors:

Base Round:
CO 4, split in half and join in the round
R1 - k
R2 - k1m1, all the way around.
R3 - k
R4 - k1m1, all the way around.
R5 - k
R6 - k1m1, all the way around. *You should have 32 stitches.
R7 - k7, k1m1, k7, k1m1, k7, k1m1, k7, k1m1 *You should have 36 stitches.


Petals
You are going to divide these 36 stitches into 6 petals. This is really very simple. Pull the cable so that all of the stitches are congruent and there is no gap. Pull the cable out, six stitches from the top needle, and slide those six stitches to the end of the needle while the rest remain on the cable.

Knit the six stitches, turn, and purl back.
Repeat this for 8 rows and then begin decreasing.
R9 - k2tog, k2tog, k2tog
R10 - purl
R11 - k2 tog, k
R12 - k2tog, snip the yarn leaving a 4 inch tail, pull the tail into the last loop.

Slide the next six stitches on your base round onto your needle, just as you did the first. Start the yarn again in the first stitch and form follow the steps above.
Do this for the remaining petals.

Weave in all of your ends, on the outer points.


Finishing Flowers
Once you have knitted two star flowers, decide which is going on top and which is going on the bottom. On the bottom flower, weave in all of your tail strings.
Place the top flower where you want it, and use a crochet hook to go through the bottom flower and grab the inner tail strings of the top flower, then pull them through so that you can tie/weave them in beneath the bottom flower.

Use your crochet hook and your pistol/stamen color to create the inner bits of the flower.

                              Figure 1                            Figure 2                          Figure 3
 

You can make a fringe in the center of your flower by slipping a strand of accent yarn under a stitch and then tie the ends once or twice, snipping them short in the front, as in Figure 1.
You may choose to surface crochet in a ring as in Figure 2.
You may choose to make little balls by pulling a pieces of yarn through a stitch, knot it several times and pull the ends back through the flower and tie them off, as in Figure 3.


Leaves
On the under side of the bottom flower, insert your needle beneath 11 stitches to "pick them up" from the base round. Use your leaf color to knit across and purl back.
Take care to keep the knit stitches on the side facing up, and the purls on the back.
Knit and Purl the leaves back and forth until you have near the length of your petals. This will be approximately 10 rows. Once you have knitted to the edge of your flower, begin decreasing your outer stiches by knitting two together (k2tog) on the knitted side. Do nothing on the purled side.
Continue tapering and decreasing until you have one stitch left. Snip your yarn and pull the tail through the loop. Weave the end under.


Final
Use your tapestry needle and yarn to fix your ponytail holder to the flower. You'll want to sew through the back of the flower, wrapping it around you band.

Once this is done and you've tidied up your ends, you're good to go! Make them in different styles and colors to wear with different outfits or just get creative with them.