Showing posts with label Playful. Show all posts

Friday, November 28, 2014

Stick Figure Family Tree Ornaments


Yesterday, my little girl told me that she wanted to make some ornaments for the Christmas tree. We didn't have a lot on hand to work with, but I knew I had a nice little stash of glitter she could have fun with, and I knew I could make salt dough. Considering what other crafting supplies I had squirreled away, these are what came to my mind. Consider them a medium difficulty level, as my six year old daughter made them with (a lot of) help from me.

Supplies:
Salt dough:
       1 cup flour
       1/2 cup salt
       Water to consistancy
Food Coloring
Size 2 jewelry wire
White craft paint
Pink Paint (I used pink glitter nail polish)
Fine point Sharpie or gel pen
White glue
Paint brushes
Assorted glitter
Clear Acrylic Spray

Step 1: 
Mix the dough and separate out enough egg-yolk sized balls to make the bodies. We have six family members, so we made six bodies. Make sure you have a good consistency. You may need to add more flour or more water, to keep the dough from being too sticky or too grainy.

Fold in food coloring and knead until the color is uniform. I didn't use gloves, as you can see, and my fingers are now pink.


Step 2:

Form the bodies into pear shapes. These do not need to be completely perfect, but try to get them symmetrical. They will puff out a little during baking.

Take plain white dough, the size of a hominy kernel, and form the head.


Step 3:
Take a one inch piece of jewelry wire, form a coil on one end and push it up into the head, to form a neck. Then push the other end into the body.

A small round tube, the size of a lolly pop stem is the perfect diameter to wrap the jewelry wire for all purposes of this project.

For the ladies, since we have curly hair, I wrapped two inch pieces of wire to form ringlets. I then pressed four of them into the top of the head.

On all ornaments, make a coil on one end of a one inch piece of jewelry wire, and press it down into the top of the head. This is for the hanger.


Step 4:
Cut two 4 inch pieces of jewelry wire to make the legs and arms.

Press these all the way through the body, near the head and at the bottom.


Step 5:
With each ornament complete with legs, arms, hair for those who have it, and hanger hooks, they are ready to bake.

Put them into the oven at 250F for four hours.


Step 6:
Although the heads of the ornaments were white before and after baking, I felt that giving them a couple of coats of white acrylic craft paint gave them a more even surface. However, it is not completely necessary.

Curl the ends of the arms and legs into circles for the hands and feet.  I used a gel pen to draw on the eyes, noses and mouths, in a Charlie Brown inspired style.

Paint a small dot of pink glitter nail polish on each cheek, to give it an antiquated blush. Plain pink paint will also work.


Step 7:
When making the bodies, I made sure that I created colors that corresponded to the glitter I had put away. Because it was likely that there would be holes in the glitter, I wanted to mask it as much as possible.


Water down the white glue to make it easier to paint onto the bodies, and be sure to use a glue that will dry clearly. You want to be careful not to saturate the salt dough, get a good coverage.

Quickly sprinkle on the glitter and try to get it as even as possible.

Use a dry paint brush to dust away any glitter from the face. Gently spray it with a couple of light coats of the clear enamel, to set the glitter and keep it from flaking off.


Place a cord through the hanger hooks, clean away any stray glitter from the faces, arms and legs, and your little stick figure ornaments are ready to hang on your tree!

Monday, June 3, 2013

Make Your Own Paint and Tips For Painting With Littles

The consistency of this paint is between watercolor and craft paint.
As an artist, I have plenty of experience producing and packing up a painting station and dealing with some of the common mishaps of artistry. I am also a profoundly messy artist. It is not uncommon to find me at the end of a painting day with oil paints smudged up and down my forearms, my thighs and my face.

As a mama, I have plenty of experience painting with wee ones. My kids see me painting and what a good time I’m having, they want to paint too! You know what? Paints aren’t cheap and kids go through them quickly. I’m always running out.
What’s a frugal artist-mama to do? Well, make my own paints, of course! So along with giving you a few tips for painting with kids, I will give you paint recipe using materials most of us keep in our kitchen. Mind you, these paints are staining. Make sure your kids are wearing old clothes and don’t give them this paint the day before their scheduled portraits.

Plenty of space to let her artwork dry.
Set up a work station with lots of space. If you’re worried about your table top or flooring getting stained, you can purchase an inexpensive vinyl table cloth that can be wiped down and reused over and over. Kids are messy and the best creativity comes from being allowed to get into the project.

Have several clean shop rags ready to clean up spills or blot paint brushes. We prefer not to use paper towels at my house and instead we use inexpensive shop rags that can be washed and used repeatedly. I find this much more convenient (as I always have plenty) and Earth friendly than throwing away dozens of used paper towels. It’s also much less expensive.


Use a wide flat bottomed bowl for rinsing their brushes, rather than a skinny jar or glass. Those glass jars are tricky when you’re a little one. I prefer a margarine tub or something similar that will sit flat, hold plenty of water and be difficult to tip over.

Give them paints in individual cups (recycled yogurt cups work well) rather than a pallet. There will be less mixing of the colors. I find that giving my little ones paint pallets with small wells of colors becomes a big muddy mess as they can’t seem to help themselves from trying to pick up all of the colors at once. Maybe that’s just my kids…

Make sure you have a place set aside beforehand to dry the artwork.  My kids like to paint in sprees and will have several drippy sheets of paper by the time they’re done. We often designate the covered porch for a drying spot, but sometimes it’s rainy or windy. The kitchen table is handy if we take the time to clear it off. What’s annoying is having to run around with a soppy wet sheet of paper and finding no good place to set it.


Play some music. When kids are just learning to paint and draw, much of what they create is interpretive. Music can help get their creative juices flowing and keep them into their painting for longer periods. This would be a great time to play some jazz or something with a lot of feeling and  movement.


Don’t instruct them. That would be so boring! We know the sky is blue, so what if they want to make it green? Who cares if their apple tree looks more like a bush than an actual tree? What of it? Just let them be, let them play around. Interfering will just throw up creativity blocks and maybe even put them off of painting. Just as forcing kids to read books they don’t enjoy can put them off of reading, trying to make them paint or draw the way you want them to can put them off of art completely.

Have the kitchen sink clear before you start. Wow. No brainer, right? Except I always forget to do this and I find myself scrambling to clear the lunch dishes out of the way to have a place to dump the dirty water, rinse the brushes and clean the kids.

Now that you have some handy-dandy Painting with Littles advice, here’s a quickie paint recipe if you’re interested.


This is half an egg yolk with 2 tbs. water and 1 tbs. flour.
6 yogurt cups (preferably with lids)
3 egg yolks – make sure you get all of the white part off.
6 tbs. flour
12 tbs. water.
Food coloring

In a small cup, beat the egg yolks until there are no clumps. Add 3 tablespoons of water, and then the flour. Add the rest of the water, until you have a slightly thickened consistency. Divide this up between the six cups and add the food coloring. I used McCormick brand that I bought at a regular grocery store, however, you can use natural food colorings and even make your own.

For the paint shown, I used between 20 and 50 drops of coloring of McCormick Neon. These are just rough estimates. Have fun and fool around with the combinations.


These colors are very vibrant, and also quite staining.

Red: 50 drops of pink
Orange: 40 green, 10 pink
Apple Green:  20 drops of green
Dark Green: 30 blue, 10 green
Blue: 40 drops of blue
Purple: 40 drops of purple

*When my little girl mixed the green and the purple, it made a perfect black!


You can add a bit of water if necessary to lighten the colors more. As you can see in the pictures, the colors are quite vibrant. Once your little ones are finished painting, you can put the lids on the paint and keep them in the refrigerator for up to one week.

Happy Painting!

Wednesday, March 6, 2013

Make Your Own "Opoly"

I first made Futuropoly years ago for my kids Christmas gift. At the time I decided I was going to do a board game, space and the future were running themes in our household.

Futuropoly is also not the first board game I have made with Monopoly as the basis. I once did Footballopoly back when our oldest boys were wee little babes. That of course, was for my husband, and used pro football teams as property.

Whatever Opoly you choose to go with, you can have a lot of fun adapting the theme to fit the game. Most of this can also be created with items around your house, making it thrifty and eco-friendly.

To make a game, you need to put together the following components:

  • The board - I used a half inch square piece of nice plywood. You want it to be furniture grade wood because it's going to last for years. This board is 2' x 2'.
    Use a straight edge and ruler to partition off the property slots. You'll have a large square in each corner, and nine slots in between each one. I painted mine with inexpensive watercolor paints, acting as stain. I used a sharpie marker to draw the straight lines, and then I applied polyurethane over the top to seal it all in. The gold paint went on last, because polyurethane causes the gold to smear.

    Create the property names with the theme of your game. Some of ours are "Omega 1 System" and "Alpha Center." Regions of outer space, in other words. I looked up names of star systems and galaxies. Where the colors coordinate, the names also coordinate. For instance, the red properties are "Delphius Scape," "Dorado Lat," and "Draco Region."

    Instead of railroads, we have teleports, and Jail is "Suspension Chamber." Utilities are "Fusion Company," and "Fission Company," and instead of Income Tax, we have "Robot Maintenance" and "Alien Housing Tax."

    You get the gist!

  • Cards - There are two sets of cards in any Opoly game. Ours are Question Mark and Time Capsule. The Time Capsule cards refer to things in todays era. I had a ton of fun making up crazy things that could happen to either fine players or reward them. "The shifty Robot you purchased at the Hydrus Sector Swap Meet stole your space pup and fled the galaxy. Pay 700k's for Unrestrained Droid Violation."
    There are 30 cards for each stack, and were made out of poster board. I also made property cards out of poster board. Because it's Futuropoly, I accounted for massive inflation and everything costs a ridiculous amount of money.

  • Money! - This unfortunately isn't easily customizable. You can buy Monopoly Money from online sources like Ebay and Amazon. We used Play Money that we bought from the Dollar Store, but it too can be purchased from Amazon. The play money comes in higher bills than Monopoly does (usually) and this jived well with our ridiculous inflation.

  • Houses and Hotels - When I first made the game, I used Polymer Clay from the craft store and shaped little futuristic buildings with it. In the image of my board game above, you can see the way these looked, painted with purple and gold enamel.
    But that was years ago and they have been lost. Lego's work well though!

  • Characters and Dice - Dice can be bought at the store, usually with a pack of cards. Not expensive at all! And characters should not be purchased, but each person playing the game should search for their own piece, which makes it more personal and fun.

  • Box - I just chuck all of my pieces in a little non-descript box to be kept beside the game board. Except when I had Footballopoly, it was all a part of a large game set built out of MDF. I hope to make one of those again soon!


That should take care of it all! You should know the basics of playing Monopoly, and your Opoly game will go in the same manor. If you do make your own Opoly game, come back here and tell me all about it!

Monday, August 27, 2012

Homemade Bubbles and Bubble Wands

These pics are fairly self explanatory. A few weeks back, the kids wanted to blow bubbles and here's me with not a batch of bubbles or bubble wand in the entire house! What in the world could be done?

I pride myself on being a resourceful gal, so I made them some, of course!


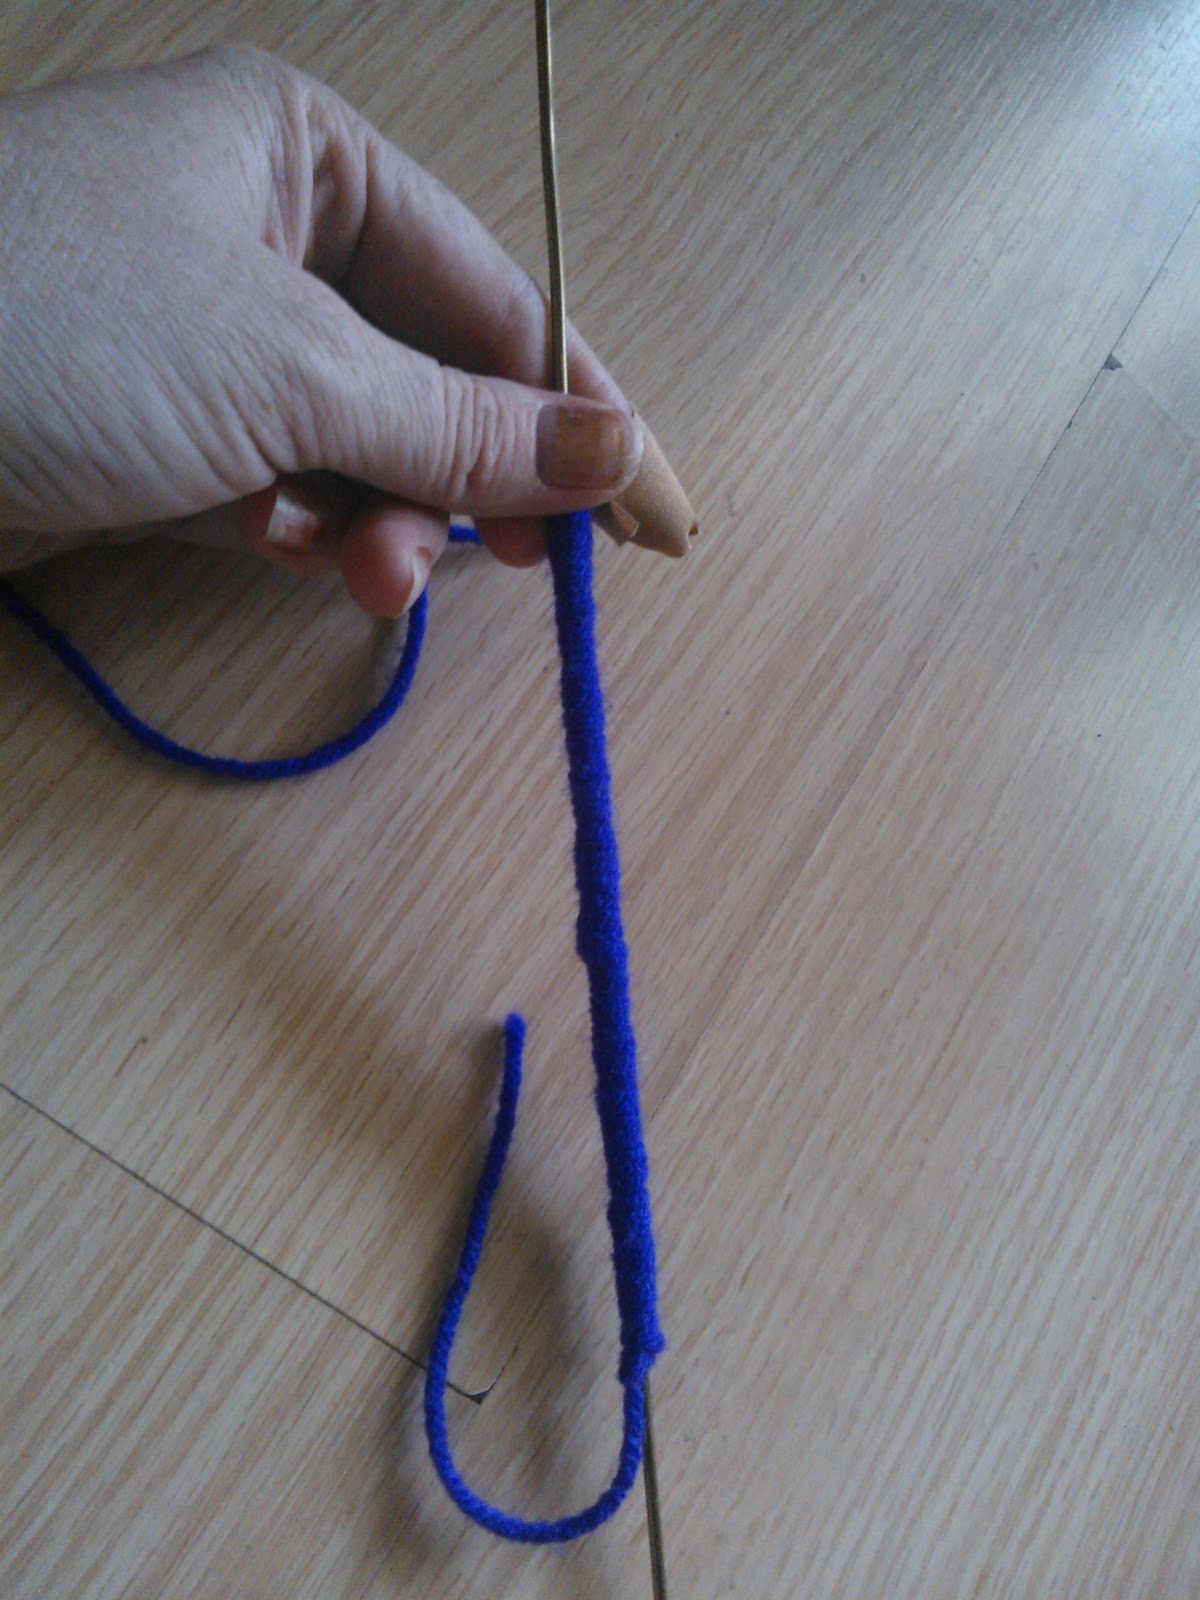
I took a wire coat hanger, straightened it out and cut the wobbly poky edges off. I took a bit of care with the wire cutters to make blunt ends and not sharp ones.

I then wrapped the center of the hanger in yarn, my knitting pals out there may see this as casting on. ;)


Then I bent to wire to make a loop, twisted it so that it would stay, and then wrapped the back ends in tape. This came off, after a while because it isn't water proof. You may wish to attach your bubble loop to a wooden stick, or wrap it in yarn, even.


The bubble mixture is a quarter cup of concentrated dish soap to 2 cups of water. Ours wasn't that great because I didn't take the time to look up the proper ratio. But it worked and the kids were thrilled for slightly longer than it took for me to set it all up!

Thursday, August 23, 2012

A Bed of You Own

Each week, my little ones and I each check out a book from the library to be read at bedtime.

This was my daughters pick, and I have to say, it makes me giggle!

Although she and I still sleep in the same bed, and I am in no rush to have her sleeping on her own, this book is a fast favorite.

As little Suzie-Sue discovers, getting to sleep in a household with multiple people can be quite an adventure.

I especially love the lyrical quality of the poetic verses, how easily they roll off the tongue with an easy flow.

There are a couple other books written about Suzie-Sue from these authors, including Achoo! Good Manners Can be Contagious, and Have You Seen my Potty?
We have not read them, but we will surly be looking for them!

A Bed of Your Own! by Mij Kelly and Mary McQuillan

Wednesday, May 23, 2012

Strange Girls and Random Laundry - Life With Teenage Boys

I am typing this while sipping my morning coffee, recounting the odd moments in my bedroom just minutes ago. As I lay in foggy sleep, I felt a movement on my pillow and an odd pressing feeling on the back of my head that was completely unfamiliar. I reached up to see what it was, and got a handful of soft fluffy fur, which immediately began humming. No... purring. It was purring. It was a cat. A very soft and large cat who was perfectly comfortable on my pillow and as I began to realize this, a glaring flaw in the arrangement propelled me to nearly jump out of bed. I don't have a cat!

How did it get in here? A cat who I have never laid eyes on found its way into my house and felt so comfortable doing so that he strolled into my bedroom at five o'clock in the morning and parked himself next to my head? I'm sure it has something to do with the five teenage boys currently camped out in my backyard. It's just one of those odd occurrences that is becoming all the more typical around here. It's just part of life with teenage boys.

As a new mother, I had the vague feeling that my life was no longer in my control. Staring at those cute little faces, knowing that my entire sanity resided with them being relatively well-behaved and of course, healthy and whole. I thought I had lost control of my life when they would shriek and wail and I would scamper to soothe and console, or I would rush around to get what I knew they wanted. I thought I lost control when they would get into my fingernail polish and decorate the coffee table with it - or when the foul odor that was plaguing my kitchen turned out to be moldy broccoli that they had cleverly hidden in the recess beside the refrigerator knowing that I never looked there.

When my kids were younger, I still had a great deal of control. The messes were, to me, fairly predictable. Permanent marker on the refrigerator, chocolate syrup splattered on the wall, what parent doesn't have to deal with those things? Strange cats in my bed, kneading the back of my head at 5am is just one of the many unpredictable events that comes with the territory of living with teenagers.

Living with teenagers is having a house that is always wrecked. I thought I had a hard time keeping it clean when they were toddlers. I've learned that once they hit a certain age, they're like Gizmo. Get them wet and the little suckers multiply. That's why I have a hoard of them asleep in my backyard as we speak. I will be sitting here minding my own business and suddenly there are all of these people milling around my house. This happens frequently. And that's not the only thing that inexplicably multiplies around here either. I don't know what to do with half of our laundry, because it's not ours! I am constantly asking, "whose shirt is this? Where did it come from? What am I supposed to do with it?" only to look up and everybody shrugs.

And the girls? Yeeeeeeahhh. It's not uncommon for me to walk into my livingroom and see some girl I have never met sitting on my sofa who is completely nonplussed by my arrival and doesn't even look up to see that my eyebrows have disappeared into my hairline. Why would she notice me? I am of no consequence. This isn't my house after all, it is my sons house and to her I just live here. I am not offended, I remember thinking along those lines when I was their age.

Living with teenagers (at least the boy variety) means my house is not my own anymore. Not only is it always dirty, but it's always full of people - some I know and others I don't. They just show up here. I could turn them away, I suppose, but then my kids would go hang out at their houses and given the propensity for teenagers to get into trouble, I'd rather they be here in my safe, gun-free, drug-free, alcohol-free environment. At least I can do a head count on the girls and when one is no longer in sight, I can ask the others where she went. Girls, after all, are much easier to spot than the boys. It's funny, because they all know I'm watching and it doesn't bother them at all (yet). They have no desire to go to another household where they can get more privacy, they like it here where they feel welcome. And eat all of my chocolate cake.

I'm in a different game now than I was when my kids were in elementary school, that's one of the few things I can say with certainty. Living with teenagers is wild, unpredictable, sometimes hilarious and sometimes infuriating, and I've only just begun. I have yet to face the scenario of trips out of town and wild parties, my oldest only starts high school in a couple short months. If it's like this already, what the heck am I going to find in my bed two years from now? Don't answer that, I'm afraid I already have an idea. There are some things I can still predict after all, even if it's becoming less and less everyday.


Photo Rights: Moodboard

Sunday, April 29, 2012

Kids Playroom + Black Paint & Sidewalk Chalk

Pretty much what the titles says. :)

We all know how yucky kids rooms get, and playrooms are the worst!

We took the carpet up months ago, and found beat up hardwood floor underneat that couldn't be salvaged. Because it's a kids playroom and bound to get gross again (duh!) we decided against replacing the carpet.

That left us with very little choices, I just decided to go with it and paint the floor. Why black? It's what I had the most of in the paint cupboard. Throw in chalkboard paint and you have a brilliant idea born out of being a complete tightwad. The kids totally love it, especially on rainy days when they can't draw outside. By the way, that is not chalkboard paint either, but regular indoor laytex, in satin finish. It works quite well!


Wednesday, April 11, 2012

Rainbow Friends

Rainbow Friend Dolls

I'm not going to get into the politics on why I decided to make these dolls, but I have been working on them for a few months now. I thought I would wait to post a blog entry once I had their clothing made, but I've gotten so busy. Don't worry, these naked cuties will soon have their garments. Likely, they will have received a fair amount of wear and tear and be looking quite raggedy by the time I finally do! So for now, please excuse the nudity! ;-)

These dolls were made using acrylic yarn, but any worsted weight should do fine. As you see, there are two of each color - a brother and a sister. I quite emphasize that fact when my children are playing with them. The kids named them as I made each one, and from left to right there are: Julia, Dannon, Gaga, Roland, Barbara, Arlo, Teena, and Louis. My husband and I did not influence the names at all, I must say, I am quite impressed with the style and variety!

And while I'm at it, I would like to plug in my first book recommendation! "A Rainbow of Friends" by PK Hallinan, just says exactly what I was wanting to say to my kids with these dolls. So when the set was complete and I gave them the dolls, I also gave them this book, and read it to them every night for about the past month. It rhymes, so that made it even more fun and kept it from getting monotonous!
A Rainbow of Friends by PK Hallinan

This pattern is very inexact. In fact, I feel like the emphasis on difference between each doll can be further compounded by making each a different shape. Therefore, I will say approximately or about, often. You can make some slightly shorter, some slightly thinner, some chubbier, some with longer torsos. In fact, you can even give them amputated limbs if you like. I didn't think to do this until after they were finished.

Supplies:

Worsted weight yarn, various skin tones.

5 size 3 double pointed needles.

Yarn scraps for holding stitches.

Various yarns for eyes and hair.

Pillow fluff

Really small crochet hook , size f, I think.

...................................................................................

So now, the pattern. On size 3 double ended needles:

Cast on 12 stitches (three onto four needles)

1. - k 1 round.

2. - k1m1 all the way around, doubling the amount stitches so that you have six on each needle for a total of 24 stitches.

3. Knit in the round for approximately 15 rows.

4. Decrease the stitches by half, by knitting 2 together (k2tog).

5. Knit 4 or 5 rows, just to make the neck.

6. Increase your stitches again by double (k1m1).

7. Knit 4 or 5 more rows.

8. Once you've completed another row and come back to your start, knit across the needle and then turn around and purl back.

9. Continue to knit and then purl two more times, so that you have 3 knitted and 3 purled rows that are not connected to the rest of the work. Just hanging down like a little flap. Cut the yarn, leaving a few inches.

10. Onto the other side of the doll, on the opposite needle of your flap, insert your needle into the first stitch and knit across, turn, purl, turn, knit, turn, purl, turn, knit, turn, purl so that you have a second flap to match the one opposite it.

11. Turn the work again and knit across the second flap. Once you come to the end of it, do not turn, but place your needle into the first stitch onto the other flap and knit a few of the stitches.

12. You're going to want to take the two unused needles that are holding your stitches at the shoulders. Use a small crochet hook or a large tapestry needle to place a scrap piece of yarn into these stitches.

13. Take the two needles you just removed from the shoulders and disperse your stitches at the bottom of the work onto all four needles evenly. It doesn't have to be perfect, you're just going to be knitting in the round again.

14. Once all of the stitches at the bottom of the work are back onto all 4 needles, continue to knit across and join the flaps at the other side and just continue to work in the round.

15. You should now have an egg shape that is the head. A neck, chest, two arm holes, and as you continue knitting your rounds, you create a trunk - about 25 to 30 rows should do.

16. Once you have your trunk knitted, there's a couple of things to do. First, take a minute to stuff the head full of fluff. Second, remove the stitches from the needles and place them onto a stitch holder or a scrap piece of yarn, and cut the yarn leaving a few inches.

17. One at a time, make your arms. Start by placing the stitches that you have on hold back onto the needle. If you followed the pattern exactly, you should have 4. Take up your yarn and knit across these. Now you want to place your needles along the sides of the armhole. You can do this by inserting a crochet hook through the front of the work, grabbing the working yarn and pulling it through, then slide your needle through. Do this about 5 times on each side, so that you have a triangle you can begin knitting in the round. Knit in the round for about 20 stitches.

18. Once you have your arm the length that you want it, decrease your stitches by half, and then half again. Cut your yarn leaving a few inches for a tail. Use your crochet hook to pull the tail in through the stitches and slip them off of the needles. Pull the tail tight to cinch the hole closed. Tie the end off the same way you would weave it in, and then use your crochet hook to pull the tail inside of the arm.

19. Do this again to the other arm hole so that you have two arms, head, neck, and trunk.

20. Stuff your arms and torso with fluff.

Now you need to get ready to make the legs.

21. Find the center of the torso from the front. Hopefully, you will have an even number of stitches, and can divide them in half equally. Where you're going to create the split for each leg, insert your needle into the first stitch on one side and take 1/3 of those stitches onto the first needle, 1/3 onto the second needle, and 1/3 onto a third needle. Keep the rest of the stitches on the scrap yarn.

22. You should at this point, have half of your stitches on hold, and the other half divided equally onto 3 needles. Insert your needle into the first needle you place (in the center of the doll), grab your working yarn and knit across all three needles. When you come to the end of your third needle, grab a fourth needle and with your working yarn, cast on a few stitches using the revers, or backwards cast on method. You can add as few as four, or as many as you have on each of your other three needles. Join the new needle to the start of the row and you now have a round to build your leg on.

23. Knit the leg in the round, about 25 rows until you have it as long as you'd like. Stuff it with fluff, and close it up, the same way you did the arms.

24. Begin the second leg in the same way you began the arms, and then knit it in the round until it is as long as the first leg, stuff it, and close it up the same way.

25. Now you should have a plain dollie. Congratulations! Now comes the fun part! Examine the doll to see which side looks more like a front. You can push and bend and shape the head to give one side more of a chin. Use your crochet hook to tie in yarn for the eyes. You can insert your hook into a stitch in the front, pull up a loop of your eye color yarn, and then pull the tails in through the loop. And then insert the hook from the back of the head to grab your tails and pull them through the entire head and out the back. If they show a little, they will be covered by hair. Hair is done the same way, except you don't hide the tails - they are the hair itself.

Whether you make a lot of different dollies or only one or two, allow your child to name him or her and if you're not too busy, make them some clothes. :)

Saturday, March 3, 2012

Knitted Hobby Horse

This is a project I'm really quite proud of, they turned out so much better than I had anticipated! I would not say that they are easy, but I am a novice knitter (still taking classes!) so I think if you have modest ability and can read a pattern, you can make these. You do need to know how to surface crochet, but there are tutorials for that too, and it is super easy!
You can google any of the techniques to see how to do them, or visit http://www.knitpicks.com/Tutorials/Knitting_Tutorials.html.

Abbreviations:

CO = cast on
K = knit
P = purl
M1L = Make one Left
M1R = Make one Right
S1 = Slip one
T = Turn
S + K + PSSO = Slip one, knit one, pass the slipped stitch back over (also called skp)
K2tog = Knit two together
P2tog = Purl two together
SSK = Slip, slip, knit (http://www.knitpicks.com/tutorials/SSK__D72.html)

Supplies:
2 colors of worsted weight yarn, + a little black and a little white, + multicolored scraps for hair.
Set of 5 (size 3) double pointed needles
2 stitch markers
Size F crochet hook
Size H crochet hook
Tapestry needle
1" dowel rod, hole put in end, painted if desired
Pillow Stuffing

On 4 double pointed needles, CO 32 stitches - 8 on each (or onto a set of circular needles).
Bring together and knit 5 rounds.


R6 - K1, M1L, K6, M1R, *K2, M1L, K6, M1R - Continue from * to end of round.
R7 - K round.
R8 - K1, M1L, K8, M1R, *K2, M1L, K8, M1R - Continue from * to end of round.
R9 - K round.
R10 - K1, M1L, K10, M1R, *K2, M1L, K8, M1R - Continue from * to end of round.

Making the increases, knit the first stitch on each new needle you come to. Pull the stitches apart and find the horizontal bar and lift it over onto your left needle. The M1L increases will have your left needle scoop up the bar from the front, the MIR will have your left needle scoop the yarn up from the back. http://www.knitpicks.com/tutorials/Make_1_Increase__D67.html

R 11 - 15, K rounds (should have 56 stitches)

Changing colors is as easy as sliding the needle in for the new row, loop the new color over it, and pull it back through to knit it. Don't be tempted to tie the new color into the old color, leave it be and you can snug them up and secure them later.


R 16 - 25, K rounds in alternate color.

I placed a stitch marker on one side, just so I could keep track of which side I was working on without having to look for my tail string.


R 26 - 50, K rounds in original color.
(Make a flap)
R 51 - K 14 stitches, place next 28 stitches on reserve, place remaining stitches onto 1 needle.

OR knit 14, across to the end of your 1st needle, then slide the stitches from the fourth needle onto the right side of that first needle to give you a triangle with 28 stitches on one needle, then 14 on both 2nd and 3rd needles. Leave needles 2 and 3 alone, then the work, slip one stitch and purl across for row 52.
Even rows 52 - 78 - S1, P 27, T.
Odd rows, 53 - 77 - S1, K 27, T.

This is the same technique used to make socks.


(Turn the Flap)
1 - S1, K 15, S + K + PSSO, K, T
2 - S1, P5, P2tog, P1, T
3 - S1, K6, S + K + PSSO, K, T
4 - S1, P7, P2tog, P1, T
5 - S1, K8, S + K + PSSO, K, T
6 - S1, P9, P2tog, P1, T
7 - S1, K 10, S + K + PSSO, K, T
8 - S1, P11, P2tog, P1, T
9 - S1, K12, S + K + PSSO, K, T
10 - S1, P13, P2tog, P1, T
11 - S1, K14, S + K + PSSO, K, T
12 - S1, P14, P2tog, P1, T

I was following a sock tutorial for this section of the horse, and being fairly new to knitting, I was sure that I was mis-reading the pattern. Nope! It was right and magically, a little cup formed, perfect for the top of the horses head!


Knit back to end on the left side of the work. Go around the opening, picking up all of the stitches and placing them back onto the 4 DPN.

To pick up the stitches on the sides of the opening, you have these nice edge stitches from where you slipped the first stitch on either side. You can use a needle to go into the front of each stitch, wrap the yarn and pull it back through, but what I did was use a small crochet hook to reach in and grab the yarn. I then just slid my needle in under neath it once all of the stitches were picked up.


K 1 full round, the end of the round will be at the top left corner, when looking from the front. You want to have 14 stitches on top, 16 on both sides and 28 on the bottom, take a couple rows to increase or decrease to this number, if necessary.
Switch to alternate color, K five rounds.

The stitch marker at the top is completely unnecessary, but I liked it there to mark the center of my work since I was now free forming. You can see this is a rather convenient shape to our horses head, with it being much wider at the bottom than the top.


Switch back to main color (row count starts over from here)
1 - 12, K round.
13 - K 16, SSK, K 52, SSK, finish round.
14 - K 16, SSK, K 50, SSK, finish round.
15 - K 16, SSK, K 48, SSK, finish round.


With that last batch of decreases, you created a couple of little "eye sockets". This is a very subtle bit of shaping, and you've marked where you will place your eyes later.


16 - K4 rounds.
17 - K 34, place stitch marker, K 14, place second maker, finish round.


You place the stitch markers on the bottom needle, seven stitches in from both ends.Your decreases will be between these two markers. It's not the prettiest seam, but it's on the bottom and won't show, but your head will have the right profile.


Decreasing the muzzle.
18 - 23, K to marker, K2tog, K across to 2 before next marker and K2tog, finish round.
24 - 27, K rounds (should be 56 stitches)
Switch to alternate color
28 - 32, K rounds.
Switch back to main color
33 - K 22, K2tog, K22, K2tog, finish round.
34 - K round.
35 - K 21, K2tog, K22, K 2tog, finish round.
36 - K round.
37 - K 20, K2tog, K22, K2tog, finish round.
38 - K round.
39 - K 13, SSK, K35, SSK, finish round.
40 - K 11, SSK, K32, SSK, finish round.
41 - K 10, SSK, K31, SSK, finish round.
42 - K 10, SSK, K30, SSK, finish round.


After the last set of decreases, you should have 10 stitches on your top needle, 8 on both side needles, and 16 on your bottom needle.


Closing the mouth - knit upper and lower flaps, bind off.
Bottom Flap:
1 - K 17, T.
2 - S1, P 16, T.
3 - S1, K 16, T.
4 - S1, P 16, T
Bind off.
Top Flap:
1 - K 10, T.
2 - S1, P9, T.
3 - SL, K9, T.
4 - S1, P9, T.
5 - SL, K9, T.
6 - S1, P9, T.
7 - SL, K9, T.
Bind off.
Bind off both sides.

Once you have knitted your flaps, you should have something that resembles a catfish with a big gaping maul and lots of loose strings - two ends for each side, except the top.


Turn work inside out and weave in all ends. Use a tapestry needle and main color of yarn to sew the mouth flaps shut. You want to take care to get the mouth symmetrical.


You want to place two tie strands on either side of the head, to tie into the hole in your dowel rod so that your horses head doesn't go flying off of the stick while your child plays. Just put a piece of yarn, about 12 inches long through a loop in the knit just behind the middle color band, about eye level. Just make sure you get them in the same place on each side of the head. Now turn the head right side out and do the finishing.


Finishing
Make 2 eyes:
Make a magic loops with 5 stitches, using black worsted weight yarn. Slip stitch to close. Crochet single stitch twice into each base stitch, for a total of 10 stitches. Slip stitch to close. Bring needle up through center of ring and pull the tail of the yarn to the back. Weave it over to the side, opposite the ending tail string so that you have a string coming off of each side.


Hook a short strand of white yarn and pull it up through the center of the round, then pull it back through somewhere in the middle of the round to make a small "highlight".


Find the eye sockets that you made on the horse head and pull the 2 white strands and 2 black strands into the head. Make sure the highlights match on both eyes.


Use the main color of the horse to surface crochet the top of the eye, this will secure it better and make an eyelid.
Slip the needle through the bottom hole of each stitch, through a strand of knitting behind the eye, wrap one over and pull through. Pull all of the tail ends into the head and weave them in.


Use the main color of the yarn to surface crochet two upside down horseshoe shapes to create nares (nostrils), near the front of the mouth where you made decreases in rows 33 to 36. Pull both tail ends into the work and weave them in.


Ears!

Find the seams where you made the cup for the top of the head. Fold the seam down and you will find 6 vertical stitches evenly placed on either side of the top of the head. Slide a double pointed needle into these on both sides and start a new strand of yarn.


1 - Start a new strand yarn from the right, knit the first row, turn.
2 - K1M1 for all six stitches, so that you have 12 stitches.
3 - S1, P11, T.
4 - S1, K11, T.
5 - S1, P11, T.
6 - S1, K11, T.
7 - S1, P11, T.
8 - S1, K11, T.
9 - S1, P11, T.
10 - SSK, K8, SSK, T.
11 - P9, T.
12 - SSK, K6, SSK, T.
13 - P8, T.
14 - SSK, K4, SSK, T.
15 - P6, T.
16 - SSK, K2, SSK, T.
17 - P4, T.
18 - SSK, SSK.
Cut the yarn yarn leaving a good six inch tail. Pull the tail through the remaining two stitches. Pinch the ear together, where it is naturally trying to roll inward. Use a tapestry needle and your tail string to sew this closed to the point where the decreases begin so that the bottom of the ear remains opened and the top is permanently shut.


Once the ears are in place, you can stuff the horses head. After filling the muzzle, turn the neck inside out and slip your tie strands into the hole of your dowel rod and tie them. You do not want these to be tight, you want about 3 to 4 inches of slack on each side. Finish stuffing then neck, your horse may have dimples from the tie strands. This is fine so long as they are not too super tight. Once the neck is all the way full, use your crochet hook to weave a doubled over strand of yarn through the bottom of the neck hole. Pull it tight and tie it shut. If you want, you can do this with a second doubled over strand of yarn, just below the head to give it a bit better definition between the neck and the head.

Reigns:
Cut six pieces of yarn, about 3 feet in length. Fold each in half and use your crochet hook to pull them through a loop of yarn at the front color band near the horses mouth. You want 3 pieces on either side of the "bridle", looping them through as if to surface crochet and them loop them onto themselves to secure them. With the now six long strands attached at either side of the horses muzzles, braid them together until you get to the second color band behind the horses cheek. Use the crochet hook to pull them through three loops to secure them, then continue to braid them together. When you get both sides finished, tied them together to have a reign that is not too long or too short.
The mane:
Using the same technique that you used to make the reigns, cut many strands of yarn in your desired colors, about six to eight inches long and slip them through two at a time and loop them onto themselves until you have built your horses mane. Once the mane is finished, so is your childs new hobby horse!